

We previously wrote about how to set up a generic routing encapsulation (GRE) tunnel for Incapsula IP Protection on an Ubuntu AWS Client. In this article, we’ll take you through the steps to configure a GRE tunnel on a Cisco router. We’re including instructions for Cisco routers because they continue to be the most popular brand of enterprise routers and network switches.
Establish the GRE Tunnel Interfaces on the Router
Before you establish the GRE, note the example screenshot below that shows you the five IPs you’ll be working with. Incapsula will provide you three IPs labeled “Incapsula Public IP”, “Customer Private IP” and “Incapsula Private IP” that will be used, together with the “Customer Public IP” to configure the GRE. The address labeled “Incapsula Protected IP” in the screenshot is the new protected IP address from Incapsula that will be allocated to your server and used to send and receive filtered traffic.
Please note when you are configuring you’ll need to replace the text in bold with the requisite addresses you received.
The first step is to configure your firewall device with the appropriate tunnel interfaces.
- Before we begin with the tunnel configuration, we need to make sure no ACL is blocking GRE protocol (47) from the Incapsula Public IP to the Customer Public IP. After it is done, we will proceed with the configuration.
- Use the Cisco IOS command line interface (CLI) to access your router’s global configuration command mode.
- At your router’s
(config)prompt, define a new tunnel interface. You’ll need to supply your own values for items in bold.
Example
myRouter(config)# interface Tunnel 1
myRouter(config-if)# description GRE tunnel to Incapsula
myRouter(config-if)# ip address Customer Private IP
myRouter(config-if)# ip mtu 1476
myRouter(config-if)# ip tcp adjust-mss 1436
myRouter(config-if)# tunnel source Customer Public IP
myRouter(config-if)# tunnel destination Incapsula Public IP
Notes
Tunnel 1– You can specify any number, butTunnelis a required component of the interface name. For example, you could specifyTunnel 98.descriptionis free text you supply to make sure you can easily identify the interface.ip tcp adjust-mss 1436– Include this command to enable TCP maximum segment size adjustments. The Incapsula Protected IP service requires that the operating system of all of your network devices support TCP MSS adjustments. Do not omit this command.
- After configuring the following, the GRE tunnel should be up. You can verify it by pinging Incapsula Private IP.
Deploying IP Protection
At this point, you have a choice, to configure the new IP on the server itself, or use the network address translation (NAT). Choose one of the following for the appropriate steps:
Static Incapsula Protected IP
In this option you will configure the Incapsula Protected IP on your server itself and ensure traffic is directed toward it.
Static routing sends traffic from the Incapsula Protected IP to a fixed address for your server.
- Configure the Incapsula Protected IP on your server.
- Configure a static route on your router device (this will direct traffic toward it). The route’s next hop needs to point to an IP configured on your server. (This IP is the one that belongs to your local area network.)
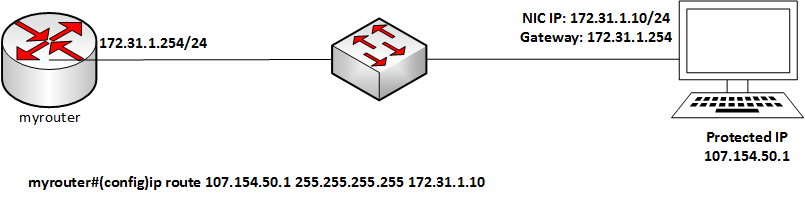
Example
myRouter(config)# ip route Incapsula Protected IP 255.255.255.255 next-hop-IPNote
next-hop-IP is the address used to reach the server, which is usually among the IPs configured on your server NIC interface.
NAT Incapsula Protected IP
Use network address translation (NAT) to translate the Incapsula Protected IP to the current IP address of your server. With this configuration, you don’t need to configure the Incapsula Protected IP on the server itself.
There are two ways to configure NAT translation: Full network address translation of the entire address, and port address translation (PAT) of specific ports. Choose one of the following for the corresponding steps:
Option A: NAT configuration
- On your router, configure network address translation from the Incapsula Protected IP to your current server IP.
myRouter(config)# ip nat inside source static current server IP Incapsula Protected IP extendable
- Then, make sure to specify which interfaces on the router are “internal” and which are “external”
Example
myRouter(config)# interface Tunnel 1
myRouter(config-if)# ip nat outside

myRouter(config)# interface x/x(your WAN interface)
myRouter(config-if)# ip nat outside

myRouter(config)# interface y/y(your LAN interface – toward the server)
myRouter(config-if)# ip nat inside
Option B: PAT configuration
- At your router’s
(config-if)#prompt, configure port address translation that translates specific ports from the Incapsula Protected IP to your current server IP.
myRouter(config)# ip nat inside source static tcp current server IP port_number _ Incapsula Protected IP port_number extendable
2. Then, make sure to specify which interfaces on the router are “internal” and which are “external”
Example
myRouter(config)# interface Tunnel 1
myRouter(config-if)# ip nat outside

myRouter(config)# interface x/x(your WAN interface)
myRouter(config-if)# ip nat outside

myRouter(config)# interface y/y(your LAN interface – toward the server)
myRouter(config-if)# ip nat inside
Configure Policy-based Routing
If you want the route to be symmetric, as a final step, configure policy-based routing to ensure the symmetric flow. With this configuration, traffic directed to your network through the GRE interface must return through the same interface.
Enter the following commands on your Cisco router to establish policy-based routing. Remember to replace bold items with actual values.
- Enter the following commands to create an access list that will match traffic from the Incapsula Protected IP to any destination:
myRouter(config)# ip access-list extended name2
myRouter(config-ext-acl)# permit ip host Incapsula Protected IP any
IMPORTANT
Please note that if you configured NAT, you should use the current server IP address in the above configuration, instead of Incapsula Protected IP
2.
myRouter(config)# route-map name permit 10
myRouter(config-route-map)# match ip address name2
myRouter(config-route-map)# set ip next-hop Incapsula Private IP
myRouter(config)# route-map name permit 20
3. Enter the following commands to apply the policy route to the LAN interface, where the server is connected.
myRouter(config)# interface y/y(your LAN interface – toward the server)
myRouter(config-if)# ip policy route-map name
Notes
name can be any value, but must be the same in all instances.
name2 is the name of an access list to use for matching traffic sourced by the server and forwarded via the tunnel. It must be the same in all instances.
That completes your configuration. From this point, you can ping the server and start seeing traffic routed through Incapsula. If you have any questions, please let leave me a comment.
Try Imperva for Free
Protect your business for 30 days on Imperva.