Imperva recently launched the Imperva GitHub where our global community can access tools, code repositories and other neat resources that aid collaboration and streamline development.
The nice thing about these tools is that you can clone them and customize them with whatever functionality you need. If you are nice you can also push new capabilities and even bug fixes — we are not perfect 🙂 — back into the repository, so other Imperva users can benefit.
In this blog I will present the site-protection-viewer. It allows you to manage your Cloud WAF (formerly Incapsula) account by providing a summary of your web sites’ protection states, and also validates that your origin servers are protected (by restricting non-Imperva traffic). These capabilities are currently not available out of the box in Cloud WAF.
Usage is very simple: set your API_ID and API_KEY in the settings file and run a command in the Command Line. The output is 2 files (html and csv) that provide your site configurations and the state of the origin servers.
This tool is written in nodejs and uses the nodejs capabilities of running requests in parallel in order to shorten the processing time. It uses the Incapsula API which provides access to the account information.
Running the Tool is very Simple
 Account Protection Example (html format)
You can see that origin servers are checked using http: and https: protocols. The Summary table can also be saved to a csv file depending on the settings (default is save).
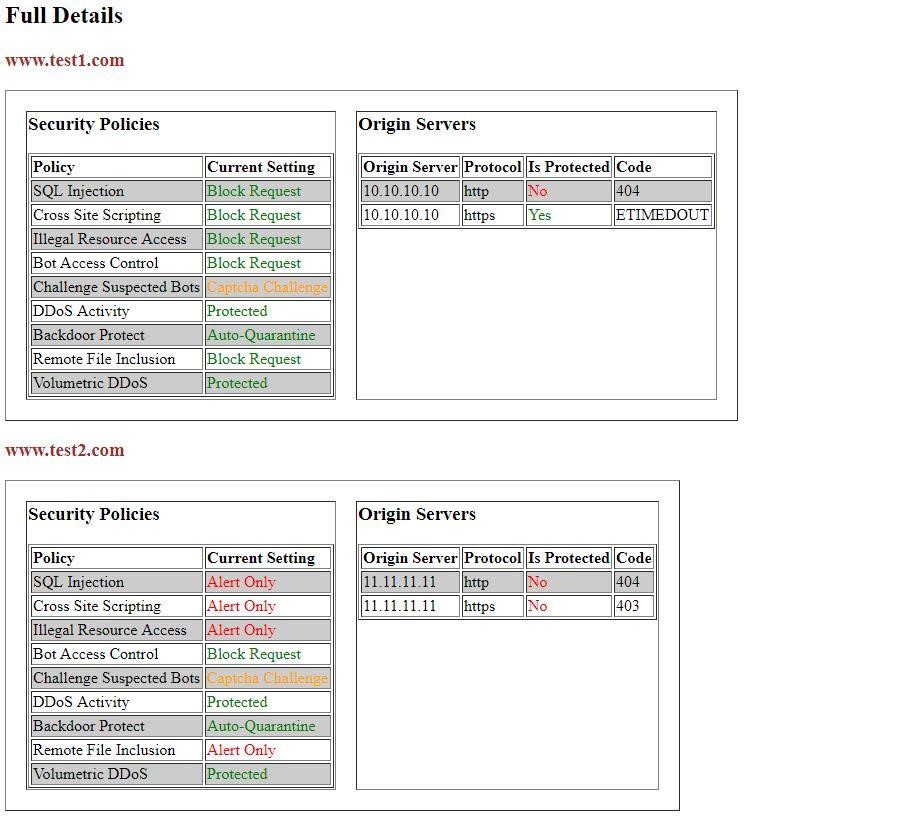
Full Details (html format)
 This section is added to the above if the showFullDetails flag is set to True in the settings file. The full details show the actual values that are returned by the Incapsula API for the specific site.
![doron3]() Why is it important to restrict traffic from non-Imperva networks?
Why is it important to restrict traffic from non-Imperva networks?
Well, it is quite simple. Consider the following analogy. You have a house with a main door. Since you want to protect your house, you post a highly-trained guard at this door in order to grant entry to allowed personnel only. However, there is a catch! Your house has a small backdoor that is unlocked with no guard. Although you have invested a substantial amount of effort at the front door, an unauthorized person can still enter without being noticed and potentially wreak havoc in your house.
The same goes with the origin server IP addresses. You are well protected by Imperva on your main entry to the public internet via the DNS. However, if you don’t restrict (lock) your origin server from receiving direct traffic from the public internet, you are exposed to all the bad stuff you are paying to be protected from.
How to install the site protection viewer
Step 1: Install nodejs.
Step 2: Download the project files from the site-protection-viewer github repository and save them locally in a directory of your choice (aka project directory).
Step 3: In the project directory, open a command prompt and run ‘npm install’.
Step 4: Configure the relevant parameters in the settings.js file.
Step 5: In the project directory run command: ‘node spv’.
Output files can be found in the configured directory.
Conclusion
site-protection-viewer provides you with a summary of the web sites protection states managed by Cloud WAF. Simply download the tool, configure a couple of settings, and run a command. If you want, you use the code of this tool to develop custom-made tools that you can contribute back to the community.
If you want some more neat stuff to help you manage your account, check out the account-level-dashboard tool which provides a graphic dashboard of some of your Cloud WAF account settings.
Try Imperva for Free
Protect your business for 30 days on Imperva.


 Why is it important to restrict traffic from non-Imperva networks?


